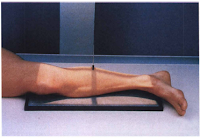
Lateral View - Lateral Rotation : Leg (tibia and fibula)
Xray examination of the leg (tibia and fibula) is taken in lateral recumbent position, the affected side down, and opposite leg may be placed behind the affected leg and put pillow or sandbag for support. This projection is taken for localization of lesions and foreign bodies and determination of extend and alignment of fracture is demonstrated is present.Place shield over pelvic and gonadal area.
Technical Factors:
 IR size - 35 x 43 cm (14 x 17 inches), divided in half, lengthwise (or diagonal, which requires 44 inches [110 cm] SID)
 Detail screen
70 +-5 kV range
To make best use of cathode heel effect place knee at cathode end of xray beam.
mAs 6
Patient and Part Position
Take radiograph with patient in the lateral recumbent position, injured side down; the opposite leg may be placed behind the affected leg and supported with a pillow or sandbags.Lateral mediolateral tibia and fibula
Ensure that leg is in a true lateral position. (Plane of patella should be perpendicular to IR.)Ensure that both ankle and knee joints are 1 to 2 inches (3 to 5 cm) from ends of IR so that divergent rays will not project either joint off IR.
For most adults, the leg must be placed diagonally (corner to corner) on one 35 x 43 cm IR to ensure that both joints are included. (Also, if needed, a second, smaller IR may be taken of the joint nearest the injury site.)
Central Ray and Collimation
CR perpendicular to IR, directed to midpoint of leg.Minimum SID of 40 inches (100 cm); may increase to 44 or 48 inches (100 to 120 cm) to reduce divergence of x-ray beam to include more of body part (increase mAs accordingly)
Collimation on both sides to skin margins, with full collimation at ends to include maximum knee and ankle joints.
Alternative follow-up exam routine:
The routine for follow-up exams of long bones in some departments is to include only the one joint nearest the site of injury and to place this joint a minimum of 2 inches (5 cm) from the end of the IR for better demonstration of this joint. However, for initial exams, it is especially important when the injury site is at the distal leg to include the proximal tibiofibular joint area because it is common to have a second fracture at this site.Cross-table lateral:
 If patient cannot be turned, this image can be taken cross-table with cassette placed on edge between legs. Place support under injured leg to center leg to IR, and direct horizontal beam from lateral side of patient.
 Radiographic Criteria - Lateral Leg
Lateral Tibia and Fibula
The entire tibia and fibula should be included with both ankle knee joints included on one (or two if needed) IR(s). (Exemption is alternative routine in follow-up exams)Proper Patient Positioning
A true lateral of the tibia and fibula without rotation will demonstrate the tibia tuberosity in profile, a portion of the proximal head of the fibula superimposed by the tibia, and outlines of the distal fibula seen through the posterior half of the tibia.Posterior borders of femoral condyles should appear superimposed.
Collimation and CR:
Close side collimation borders should be visible, but only minimal , if any, border should be visible at the ends to maximize visualization of both joints.Exposure Criteria:
Good exposure density without motion will result in visualization of sharp trabecular markings and sharp borders of entire tibia and fibula.Optimal exposure with correct use of the anode heel effect will result in near equal density at both ends of the image.
Contrast and density should be sufficient to visualize soft tissue and bony trabecular markigns.


